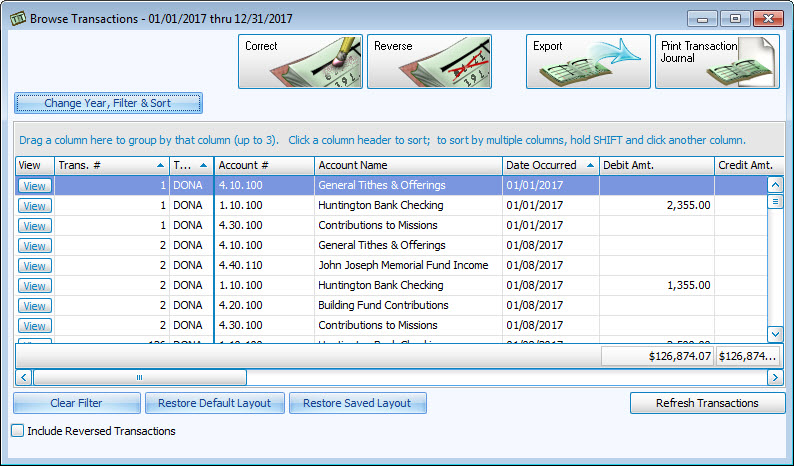
Browse Transactions
Every transaction that is either transferred to, or entered from within the Accounting Module can be found on the Browse Transactions screen. Use the features on the Browse Transactions screen to locate, reverse, correct, or print any set of transactions. Transactions can also be exported to a file, which can be saved to disk and sent by email.
To access the Browse Transactions screen:
- From The Initial Portal of Church Windows choose Accounting.
- Click Transactions in the Button Bar at the top of the screen
- Then click the Browse button from the options that appear.
- Click the Change Year, Filter & Sort button to locate any transaction(s) you seek.
- Fill in the fields as many Transaction Browser Options screen fields needed to narrow down the list of transactions to what you seek, and click OK.
- Look for your transaction(s) in the list. Repeat this as many times as necessary until you find your transaction(s).
- If you choose to make changes to your transaction information, click to select it.
- Then, click the Correct button to enter a correction transaction, or the Reverse button to enter a reversal transaction.
- For either option you choose, a screen will appear with additional Transaction Corrections and Reversals options.
- Reversals will appear on the Browse Transactions list only when you place a
 checkmark in the Include Reversed Transactions box.
 - You can change the layout and the columns that sort the transactions list, by either clicking the Change Year, Filter & Sort button and using the Group & Sort tab, or clicking items and dragging them to places on the screen, as explained below.
- At any time, click the Clear Filter button to restore the transactions list to the original sort order — by the Date Occurred in Ascending order.
- Just as well, click the Restore Default Layout button to return any column and grouping changes to their original state or Restore Saved Layout to view by a specific set of previously selected filters.
Once you have made all of your selections, you can click Print Transaction Journal to view a Print Preview and then proceed in sending the file to your printer. You can also click Export to save the report as a file to be used outside of Church Windows.
 View Transactions
Click the View button at the far left of each row to view the full details of that transaction.
![]()
Sorting the List of Transactions
The screen will open to a list of current Accounting Year transactions that is sorted by the Date Occurred in Ascending order. As a result, the earliest date on which a transaction took place will be listed at the top of the list. And as you scroll the list to the very bottom, the date will advance as each transaction is revealed. The Browse Transactions screen indicates this sort order with an ![]() up arrow in the Date Occurred column.
up arrow in the Date Occurred column.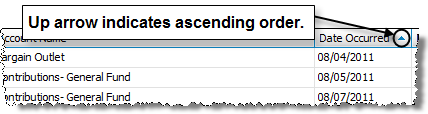
To reverse the order of the transactions, click any column with an ![]() up arrow once. The same column will then show a
up arrow once. The same column will then show a ![]() down arrow to indicate that the transactions are now sorted by the selected column in Descending order.
down arrow to indicate that the transactions are now sorted by the selected column in Descending order.
Note:
If the Browse Transactions screen opens to a list of transactions that is not sorted by the Date Occurred in Ascending order, as mentioned above, click the Clear Filter & Sort button. Different transaction list layouts, sorts, and filters can be applied on the Transaction Browser Options screen and saved as default.
Sorting By Multiple Columns
Click any column to change the sort order. Now hold the SHIFT key and click another column. The sort order of the transactions list is now determined by two columns, first by the first column you clicked, and second, by the second column you clicked. You can hold the SHIFT key and click a third column, to then sort the list of transactions by a third column. Click any of the already selected columns once again to change the direction of the sort.
Grouping by Multiple Columns
Drag the desired column to the bar above the column headers, as indicated on the screen itself. The first column you drag will then put the transactions in collapsed groups, according to that column name. Click the  button to expand the group and reveal the transactions.
Once the transactions are revealed, you can reveal other groups, or collapse a group by clicking the  button. To group together by additional columns, drag as many as two more columns to the bar. The maximum amount of columns you can drag to the bar is three. After you have dragged the columns to the bar, click any desired column header to sort by that column. Alternatively, you can also select one of your Custom Account Groups.
